PLASTERING TIPS

Tips to Improve Your DIY Plastering
Plastering is considered by many to be an art form and rightly so, as even most professional builders and keen DIY enthusiasts will not tackle a plastering job, preferring instead to recruit a professional plasterer. However, undoubtedly, here at Mastering Plastering, we believe that plastering is a skill that can be learnt quite quickly and quite painlessly even for the novice DIY-er.
The following is a list of what we consider to be the best plastering tips for the complete novice. Have fun and don't forget to try check out our complete plastering how to guide.
Plastering Tip #1: Prepare your surface before beginning plastering.
 Most people overlook this very crucial stage when contemplating plastering for the first time, after all, the reason you no doubt want to plaster is to cover over an ugly, uneven or unstable surface. Most people overlook this very crucial stage when contemplating plastering for the first time, after all, the reason you no doubt want to plaster is to cover over an ugly, uneven or unstable surface.
However, preparing your surface properly prior to plastering is essential to achieving a perfect plastering finish and one that won't start to fall away in chunks after you have finished decorating and sat down to a nice cup of tea.
Plaster will not adhere securely to any surface that is wallpapered, damp, dusty or unstable without some prior preparation.
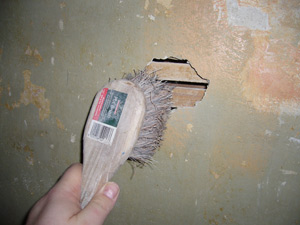
The secret is to remove any loose areas of existing plaster, dust or paper as much as you can before even contemplating plastering. Next, the surface must be treated with a mixture of PVA glue and water (the exact mixture depends on your type and is covered in our plastering course in some detail). This has two main purposes:
- Firstly, as a primer for your plastering surface. The aim here is to allow the PVA solution to dry thus reducing the suction (or thirst) of the wall. Left untreated, a surface with a high suction can literally draw the water out of the plaster before it has had a chance to set, thereby weakening the plaster skim coat and increasing the chances of the plaster falling away at a later stage (known as "blown" plaster).
- Secondly, in all cases, a three parts to one mixture of PVA and water must be applied immediately prior to plastering and it is essential that the plaster is applied while this coating is still wet. This helps bond the plaster to the surface. A top tip is to test the surface with your hand - if the mixture still feels wet then you need to wait a little while, if the and when the surface feels just tacky is the ideal time to start your first skim coat of plaster.
Plastering Tip #2: Get your plaster mix just right.
 Mixing plaster is not a fine art but there are some basic rules to follow: Mixing plaster is not a fine art but there are some basic rules to follow:
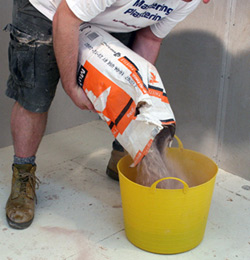
Always add the plaster to the water and never the other way around. A top tip is to first add just enough plaster so that it heaps on top of the water and mix this in first until lump free. Then add smaller amounts of plaster by hand until the consistency is smooth and lump free.
You should be aiming for the consistency of melting ice cream and the plaster should sit on the bucket trowel without sliding off when held level when its ready.
By far the best tip for mixing plaster is to test the consistency by standing a stick in the mix. If the stick can stand of it's own accord then the plaster is mixed right. Plaster and water mix in volume on roughly a 50:50 basis so half a bucket of water will make a full bucket of plaster.
Always use clean fresh water to mix plaster as any contamination can cause the plaster to go off before you've applied it. Never use plaster that is going off - unless you want forearms like Popeye the Sailor.
Plastering Tip #3: Don't bite off more than you can chew.
 This is perhaps one of the most common mistakes made by novice plasterers and is made all the worse by the fact that most untrained plasterers don't realise that a perfect finish in plastering comes not from applying it carefully but by working all six stages of plastering (from application of both coats to dry and wet trowlling right through to final polishing) quickly and at the right timing. This is perhaps one of the most common mistakes made by novice plasterers and is made all the worse by the fact that most untrained plasterers don't realise that a perfect finish in plastering comes not from applying it carefully but by working all six stages of plastering (from application of both coats to dry and wet trowlling right through to final polishing) quickly and at the right timing.
Obviously, all of this is too much to explain here which is why we put together an entire how to plaster video course which shows you how to get a perfect finish in detail.
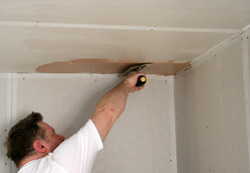
However, for your first attempt we definitely recommend starting on a small wall or surface - something you can cover with a single coat in 30 minutes or less. Of course the later stages don't have to be done in this time and have timings of their own, but 30 minutes is a good rule of thumb for banging on the first covering.
Don't try and get the surface perfect during this first coat as it is gradually improved at later stages of the various drying stages of the plaster. Using this technique not only makes plastering quicker and less painless but conversely results in a perfect finish ever time compared to trying to get too good a finish on your first go.
Plastering Tip #4: Cleanliness is the key to a perfect finish.
 Don't get me wrong, this is not a moral point, you might be a candidate for the next episode of "How Clean is Your House" at home and that's fine with me, but cleaning as you go in plastering is probably the best plastering tip I was ever given when I first learnt to plaster and there is a simple reason for this: Don't get me wrong, this is not a moral point, you might be a candidate for the next episode of "How Clean is Your House" at home and that's fine with me, but cleaning as you go in plastering is probably the best plastering tip I was ever given when I first learnt to plaster and there is a simple reason for this:
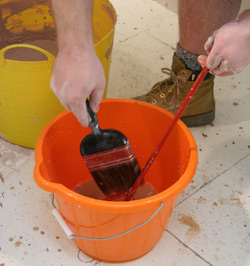
ANY contamination in your plaster will result in either the plaster setting or going off too quickly and since plastering is a race against the clock for the novice and a steady but fragile rhythm for the pro, anything which reduces the time you have to complete your job is ultimately going to cause more work than less. It's therefore a poor economy of time to not wash out buckets and equipment as you go.
Furthermore, even the tiniest fleck of dried plaster from a previous mix will cause pulls and drags in your plaster finish and frustrate the hell out of you - image having got a surface just perfect only to dredge a line right back to the plasterboard with your next stroke!
This is even more frustrating when you are in the latter stages of plastering so here is my golden rule of tips: If the water isn't clean enough to drink and your buckets and tools not clean enough to eat out of then don't use them for plastering until you have given them a thorough clean.
Plastering Tip #5: Don't over-polish your surface or you will regret it.
 Plastering is basically all about the 6 stages you must go through from the first coat, to the skim coat and then the 2 respective phases of what we call wet trowelling and dry trowelling - these are relatively simple to do but almost impossible to describe which is why we produced a "Show-You- How" to plaster video - think of it a bit like learning a martial art, you can't learn it through reading alone, you really need somebody to actually show you how it's done. The good news is that unlike learning a martial art you can learn plastering very quickly and get perfectly flat and smooth results from your very first try. Plastering is basically all about the 6 stages you must go through from the first coat, to the skim coat and then the 2 respective phases of what we call wet trowelling and dry trowelling - these are relatively simple to do but almost impossible to describe which is why we produced a "Show-You- How" to plaster video - think of it a bit like learning a martial art, you can't learn it through reading alone, you really need somebody to actually show you how it's done. The good news is that unlike learning a martial art you can learn plastering very quickly and get perfectly flat and smooth results from your very first try.
However, that said, one tip I am always giving to novice plasterers is DON'T over-polish on the final stage. Yes, if you follow my course exactly you will be able to get a plaster surface so flat and so smooth that you can literally polish it until it is a smooth as glass and even shows a slight reflection but you don't want this.
The ideal plaster finish looks and feels to the touch like eggshell and there is one very important reason for this - paint and wallpaper will peel from a highly polished surface and when you get that situation you are in big trouble because you will find it peels easily in some areas and sticks rock hard in other - completely ruining your plaster finish. So my final plastering tip is to not get too carried away in polishing in the final dry trowel stage.
Article by Mastering Plastering, written August 2010.
For more Plastering Tips, see our article on Plastering Top Tips which covers some more advanced areas of plastering in more detail.
|
