PLASTERING TOP TIPS

More Top Tips to Improve Your DIY Plastering
By popular request, here are some more plastering tips to keep you on top of your game...
Plastering Top Tip #1: Love your trowel
 Your trowel is the main tool you use to apply, smooth, flatten, repair and polish your plaster. Your trowel is your sole connection between you and your surface and as such it’s essential that it remains very clean and is of the correct type. Don’t try and use a pointing trowel or any other old trowel you might find in your dad’s shed. You need a proper plastering trowel – they aren’t expensive and are widely available. Your trowel is the main tool you use to apply, smooth, flatten, repair and polish your plaster. Your trowel is your sole connection between you and your surface and as such it’s essential that it remains very clean and is of the correct type. Don’t try and use a pointing trowel or any other old trowel you might find in your dad’s shed. You need a proper plastering trowel – they aren’t expensive and are widely available.
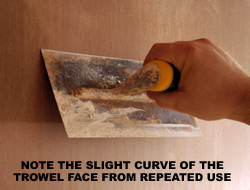
The trowel shown in picture opposite is in good condition and is well “worn-in”. Whilst its had lots of use and shows some patination (all the best ones have) its very clean and smooth and highly polished.
Your trowel will get ever sharper with use and might even convexly curve or “belly” slightly over time enabling you to get an even more perfect finish.
 Nowadays, you can even buy pre worn-in trowels. Probably the biggest name in trowels is Marshalltown and they even go up to 20” and are pre-worn-in but we warned these are not cheap but the choice of many professionals. Nowadays, you can even buy pre worn-in trowels. Probably the biggest name in trowels is Marshalltown and they even go up to 20” and are pre-worn-in but we warned these are not cheap but the choice of many professionals.
I recommend that as a beginner you stick with the standard 11 inch trowel until you are up to speed as larger trowels can be more difficult to control.
Other common sizes of trowel are 14 and 20 inch (and no, having a big one is not a sign of manliness – just a matter of preference, though of course the larger the trowel the quicker you can get the surface covered and therefore the quicker you can get the job done).
TOP TIP: Keep your trowel very clean and rust free by polishing it occasionally with some fine wet and dry paper. Some plasterer’s also grind the tip of the sharp corners to a slightly rounded edge to reduce the chances of chipping or marking the plaster with the corners when working.
Plastering Top Tip #2: Use a water spray gun instead of a splash brush
 Many plasterers prefer to use a wide brush to splash water onto the surface of the plaster – whilst this works just as well it involves a lot of bending down to a bucket of water every few seconds or ties up a hand holding a bucket that could be holding a trowel - in other words, less swapping of tools every few seconds. Many plasterers prefer to use a wide brush to splash water onto the surface of the plaster – whilst this works just as well it involves a lot of bending down to a bucket of water every few seconds or ties up a hand holding a bucket that could be holding a trowel - in other words, less swapping of tools every few seconds.
Using a simple spray bottle is in my opinion a great tip and the best way to apply water to the surface of the plaster during some of the finishing stages (wet trowel stages) explained in the Golden Formula Technique - explained in full in our plastering DVD course. Make sure your bottle has a fine and wide mist-like spray and doesn’t simply squirt a fine jet of water.
You can buy these bottles from Garden Centres or find them in the garden section of larger DIY chains. If you recycle a bottle from some kind of used up kitchen or bath-room cleaner product make sure its fully clean inside and contains no traces of whatever chemicals were in it or else this can seriously affect your plaster.
Plastering Top Tip #3: Use tin snips - not a hacksaw - to cut angle bead.
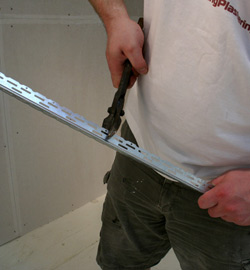 To cut angle bead use a pair of tin snips (using a hacksaw is not advisable as the blade jams in the beading). Tin snips make the job much easier and are essential is you are cutting more than a few pieces. To cut angle bead use a pair of tin snips (using a hacksaw is not advisable as the blade jams in the beading). Tin snips make the job much easier and are essential is you are cutting more than a few pieces.
Mark out where you want to cut with a pencil. Then using the tin snips first cut one of the flat sides right up to the corner. Then turn the beading over and cut the other flat side so that the bead is now only held together by the corner bulge.
Next, holding the bead in both hands carefully bend the bead a few times at the cut, being careful not to compromise the 90 degree angle of the edges, a few bends should fatigue the metal and quickly snap the corner joint. Ideally wear protective gloves for this job because cut angle bead can be razor sharp along the tip of the cut edge!
Plastering Top Tip #4: Stick to Thistle Multi-Finish for all skimming jobs.
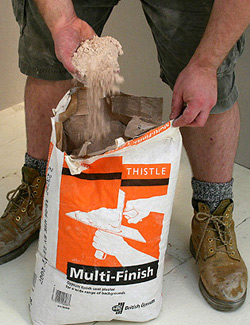 Don't be tempted by One-Coat plasters or any other type or brand of finishing plaster. Nearly all professionals use Multi-Finish by Thistle as it's the best plaster for the job. Multi-FInish plaster is identifiable by it's bright orange label and is available in all major DIY chains. Don't be tempted by One-Coat plasters or any other type or brand of finishing plaster. Nearly all professionals use Multi-Finish by Thistle as it's the best plaster for the job. Multi-FInish plaster is identifiable by it's bright orange label and is available in all major DIY chains.
As already stated, this is the most popular choice as a finishing plaster over plasterboard or undercoat plasters. It mixes to a salmon-coloured smooth creamy paste and when applied gives an eggshell smooth finish that can be further polished. It can be applied at a thickness up to approximately 3mm and always in 2 separate coats as you will see demonstrated later in the Golden Formula Technique in our plastering video course (note some plasterers will try and get away with applying just one coat of Multi-Finish when skimming – this is frowned upon by most and is very much a cowboy trick).
A simple tip when plastering is to calculate 1 x 25kg bag per 9m square to be on the safe side. Plaster is cheap after calculating get at least 1 spare bag before starting a job.
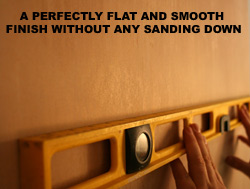
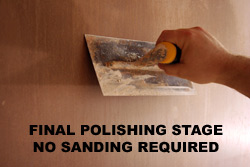
Plastering Top Tip #5: Don't sand down plaster.
 OK, I have a real beef about this issue so let me rant a little. The only reason you would ever need to sand down plaster is if you did a poor job in the first place - usually not due to you not trying your heart out to get a smooth finish but simply because you didn't follow the correct steps. OK, I have a real beef about this issue so let me rant a little. The only reason you would ever need to sand down plaster is if you did a poor job in the first place - usually not due to you not trying your heart out to get a smooth finish but simply because you didn't follow the correct steps.
Plastering is 10% skill and 90% adhering to the exact formula of the six stages of plastering as outlined in our plastering course. If you follow these six stages to the letter (we of course explain each in detail and give relevant waiting times between each stage etc) then you cant help but get a perfect finish.
A perfect finish (and by that I mean perfectly flat and smooth walls - that "new-build" look and feel) comes from working the plaster from applying through to both the dry and wet trowel stages right through to the final dry trowel polishing phase - this will produce a wall smoother and flatter than sanding down could ever accomplish.
Here’s the problem with sanding plaster:
1. It simply doesn’t work as a means of fixing a poor job as anyone who has tried it will tell you.
2. Its an excuse for rushing or laziness at the time with a “I'll sort it tomorrow” philosophy and yet…
3. Its ultimately harder work, more exhausting and gives poorer results than doing the job properly
The main problem is what plaster does to sandpaper. As soon as you start to sand plaster it will clog your sandpaper and make the surface of your paper lovely and smooth in seconds. You then scrub harder rubbing the plaster into the paper even more fully clogging it. Now, what happens when you rub a smooth thing against a smoother thing? You polish it! So as you can see, unless you own a warehouse full of sandpaper don’t be tempted to think “ah, I’ll come back and sand that later” because that my friend is pure folly and will nv er produce a finish you can be proud of - you'll notice every imperfection in that wall the minute you apply a coat of paint.
Also, unless you have been caught up in a particularly bad Egyptian sandstorm and thought to yourself “I wish my house was full of swirling dust covering every surface” then you will find that the amount of dust created even from a small wall will cost you more in time cleaning up than its worth.
 So, the most important tip of all is simply this - plastering is actually quite easy providing you follow all six stages of working it to the letter - you simply cant go wrong and you WILL get perfect results from your very first try IF and ONLY IF you follow the formula to the letter. Even a novice can achieve a perfectly smooth wall using just a trowel using our simple and time-honoured formula. So, the most important tip of all is simply this - plastering is actually quite easy providing you follow all six stages of working it to the letter - you simply cant go wrong and you WILL get perfect results from your very first try IF and ONLY IF you follow the formula to the letter. Even a novice can achieve a perfectly smooth wall using just a trowel using our simple and time-honoured formula.
You can read more on the six stages of plastering on our website at Mastering Plastering
Article by Mastering Plastering, written August 15th 2010.
For more Plastering Tips, see our other article on Plastering Tips
|
